
What Is the Process for Industrial Machine Rebuilding?
If you’re looking for industrial machine rebuilding services in Alberta, you’re probably dealing with a machine that still matters to your operation, but no longer runs as it should. Rebuilding is the middle path between limping along with constant repairs and spending big on a full replacement. It’s how you get your uptime back, tighten tolerances, and extend the life of equipment you already know, without gambling on a brand-new build that may not fit your workflow.
What “Rebuilding” Really Means
A proper rebuild is not a quick patch job. It’s a planned, measured process that restores a machine’s function, reliability, and accuracy. In many cases, it also improves the machine beyond its original state with smarter components, better guarding, updated controls, or redesigned wear surfaces.
This is where a shop like Big West Machine lines up well. Their work spans machining, repair, and rebuild capabilities, which matters because rebuilds live and die on execution. You need people who can inspect, machine, fabricate, align, and reassemble with care, not just swap parts and hope.
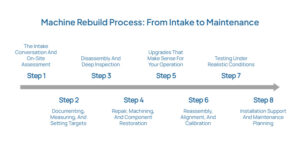
Step 1: The Intake Conversation And On-Site Assessment
It usually starts with your pain points, not a checklist.
What’s happening on the floor? Are you seeing chatter, heat, vibration, drift, scrap, leaks, or slow cycles? Are operators compensating with “workarounds” that used to be unnecessary? Those details guide the rebuild plan.
A solid assessment typically includes:
- What the machine does today, and what you need it to do next
- Current failure modes and recurring breakdown patterns
- Safety issues and guarding gaps
- Production demands, duty cycle, and downtime limits
- Parts availability and the risk of obsolete components
If you’ve ever had a machine that “works fine” until it suddenly doesn’t, you know why this stage matters. The goal is to find root causes, not just symptoms.
Step 2: Documenting, Measuring, And Setting Targets
Once the machine is selected for rebuild, the team documents what they’re working with. Photos. Drawings. Measurements. Alignment checks. Baseline runout and wear readings. Control and electrical notes. Sometimes oil samples or vibration data too, if that’s relevant.
This is also where rebuild targets get set. Not vague goals like “make it better,” but real numbers.
For example:
- Required tolerances after rebuild
- Expected cycle time and repeatability
- Bearing fits, shaft conditions, and allowable wear
- Hydraulic pressure stability and leak limits
If you’ve been fighting quality issues, this is your chance to reset the standard and stop chasing problems downstream.
Step 3: Disassembly And Deep Inspection
Disassembly is where the truth shows up. Wear patterns tell stories. A seized bearing might point to contamination. Uneven guide wear can reveal misalignment. Cracked mounts may signal vibration or overload.
A careful teardown does two things at once:
- It exposes what must be replaced, repaired, or remachined.
- It prevents reassembly on a weak foundation.
This is also where good rebuilders label, tag, and track everything. It sounds basic, but it saves you from the “mystery bolt” problem that slows projects and creates errors.
Step 4: Repair, Machining, And Component Restoration
Now the real work starts. Rebuilding often involves a mix of:
- Machining worn shafts, bores, and faces back to spec
- Rebuilding bearing journals and fits
- Restoring alignment surfaces
- Welding and remachining damaged housings or frames
- Replacing seals, hoses, bearings, and wear components
This is where having machining and fabrication in-house makes a difference. If you can machine parts precisely and quickly, you control schedule and quality. It also helps when the OEM part is discontinued and you need a custom replacement made to match the application.
A quick example. If a machine’s accuracy drift comes from a worn slide or a damaged mounting surface, swapping a motor won’t fix it. You need the mating surfaces restored and aligned, or the problem comes right back.
Step 5: Upgrades That Make Sense For Your Operation
A rebuild is also a smart moment to upgrade what’s been holding you back. Not every machine needs a full controls retrofit, but many benefit from targeted improvements.
Common practical upgrades include:
- Modernizing controls or adding better diagnostics
- Improving guarding and safety interlocks
- Updating lubrication systems to reduce wear
- Upgrading bearings or seals for harsher environments
- Reinforcing weak brackets, mounts, or frames
This part should be driven by your goals. If you’re aiming for less downtime, you might prioritize reliability upgrades. If you’re chasing tighter quality, alignment, and wear surface restoration may lead.
Step 6: Reassembly, Alignment, And Calibration
Reassembly is not “put it back together.” It’s precision work. Components go back in a controlled sequence, with torque specs, fits, and alignment checks along the way.
This often includes:
- Shaft and coupling alignment
- Bearing preload checks
- Backlash and runout verification
- Hydraulic and pneumatic system validation
- Electrical checks and sensor verification
If you’ve ever rebuilt something yourself and felt that moment when it finally runs smoothly, you know why this step is worth patience. Small errors here become big problems at production speed.
Step 7: Testing Under Realistic Conditions
A rebuild should end with proof, not promises.
Testing can include dry runs, load tests, temperature monitoring, and verification of repeatability. If the machine must hold a tolerance or hit a cycle time, this is where you confirm it.
One practical question to ask during this phase is: What does “good” look like when the machine is back on my floor? If your rebuilder can’t define that clearly, it’s hard to hold the work to a standard.
Step 8: Installation Support And Maintenance Planning
Many rebuilds fail early because the machine returns to the same conditions that wore it out in the first place. Poor lubrication habits. Misalignment from foundation issues. Dirty air supply. Overloaded cycles. Operator workarounds that never got corrected.
A good rebuild handoff includes guidance on:
- Startup checks and break-in steps
- Lubrication intervals and consumables
- Alignment re-check timing
- Early warning signs to watch for
- A maintenance schedule that matches your duty cycle
This is where your rebuild becomes an investment, not just a repair bill.
Rebuilding isn’t just about saving money. It’s about keeping your process stable. It’s about protecting lead times, reducing scrap, and giving your team a machine they trust again.
If you’re weighing rebuild versus replace, the real question is simple: what will cost you more over the next year, planned work or surprise downtime?